

This blog provides a step-by-step guide on connecting LED strips with three different types of Jackyled connectors - straight connectors, L shape connectors, and T shape connectors.
For those who are tired of reading words and images, we get you tutorial videos. Just scroll down to the end.
What will you need?
- 4-Pin LED Strip Set: a reel of light strip, power source, a controller and a remote;
- Connector kit;
- Scissors.
Get Started
Step 1 Cut LED strip
Determine how long you need and cut the strip on the copper cutting line. Do not cut on those silver soldering points.
Step 2 Remove the adhesive backing around the cutting line.
Taking the backing off can leave the strip too sticky to slide in the connector’s pins. To resolve this, you can rub the adhesive surface or even peel off the adhesive to make it less sticky. For waterproof light strips, don’t forget to remove the silicone coating over the copper line.
Step 3 Open the connector.
Prise open the connector using finger nail or a tool with a thin edge such as a sim card opener. It’s easier to open from the corner of its door instead of from the front.
Safety Warning: Although we do not recommend using scissors or knives, if you have to resort to them to open the connectors, please be super careful of their sharp edge.
Step 5: Slide the L/T sheet under the connector’s pins.
(Skip this step if you’re using straight connectors.)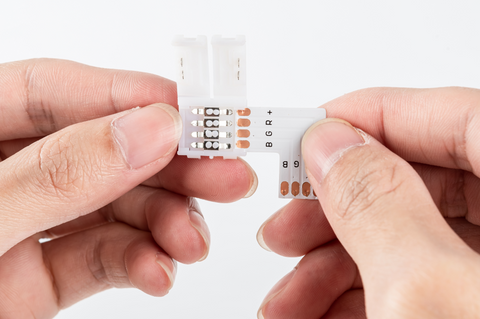
Step 6: Slide the LED strips under the connector’s pins.
Connect the light strip with + polarity aligned strip-to-strip, not strip-to-connector. When using L/T shape connectors, you could find puzzled by the order difference of the RGB+ labels between the strip and the connector. Never mind about that, just connect as the below pictures show:
Straight Connectors
Connect with the + match strip to strip.
L Shape Connectors
T Shape Connectors
Step 7: Plug in and test out the connection.
Plug in the light strip and switch colors and modes with the remote. If some sections of the light strips do not light up, or show a different color, find solutions in our previous article Intro to Light Strip Connectors (II): Troubleshooting.
Step 8: Close the clip until all strips are set up and work.
Set up your light strip to your desired setting. After all sections work and display colors correctly, you can close the clip and enjoy your new lighting!
Need more help?
Click in below links for tutorial videos on our YouTube channel:
Straight Connectors
L Shape Connectors
T Shape Connectors
Or reach out to us at service@jackyled.net to get real-person, professional customer support. Your lighting projects always have our back!